Rock Pi E设置自动连接WIFI方便ssh调试
Radxa官方的配置比绝简单,Rockpi E也没有提供源代码,这里是对官方Getting Start的一个补充
配置systemd自动连接wifi
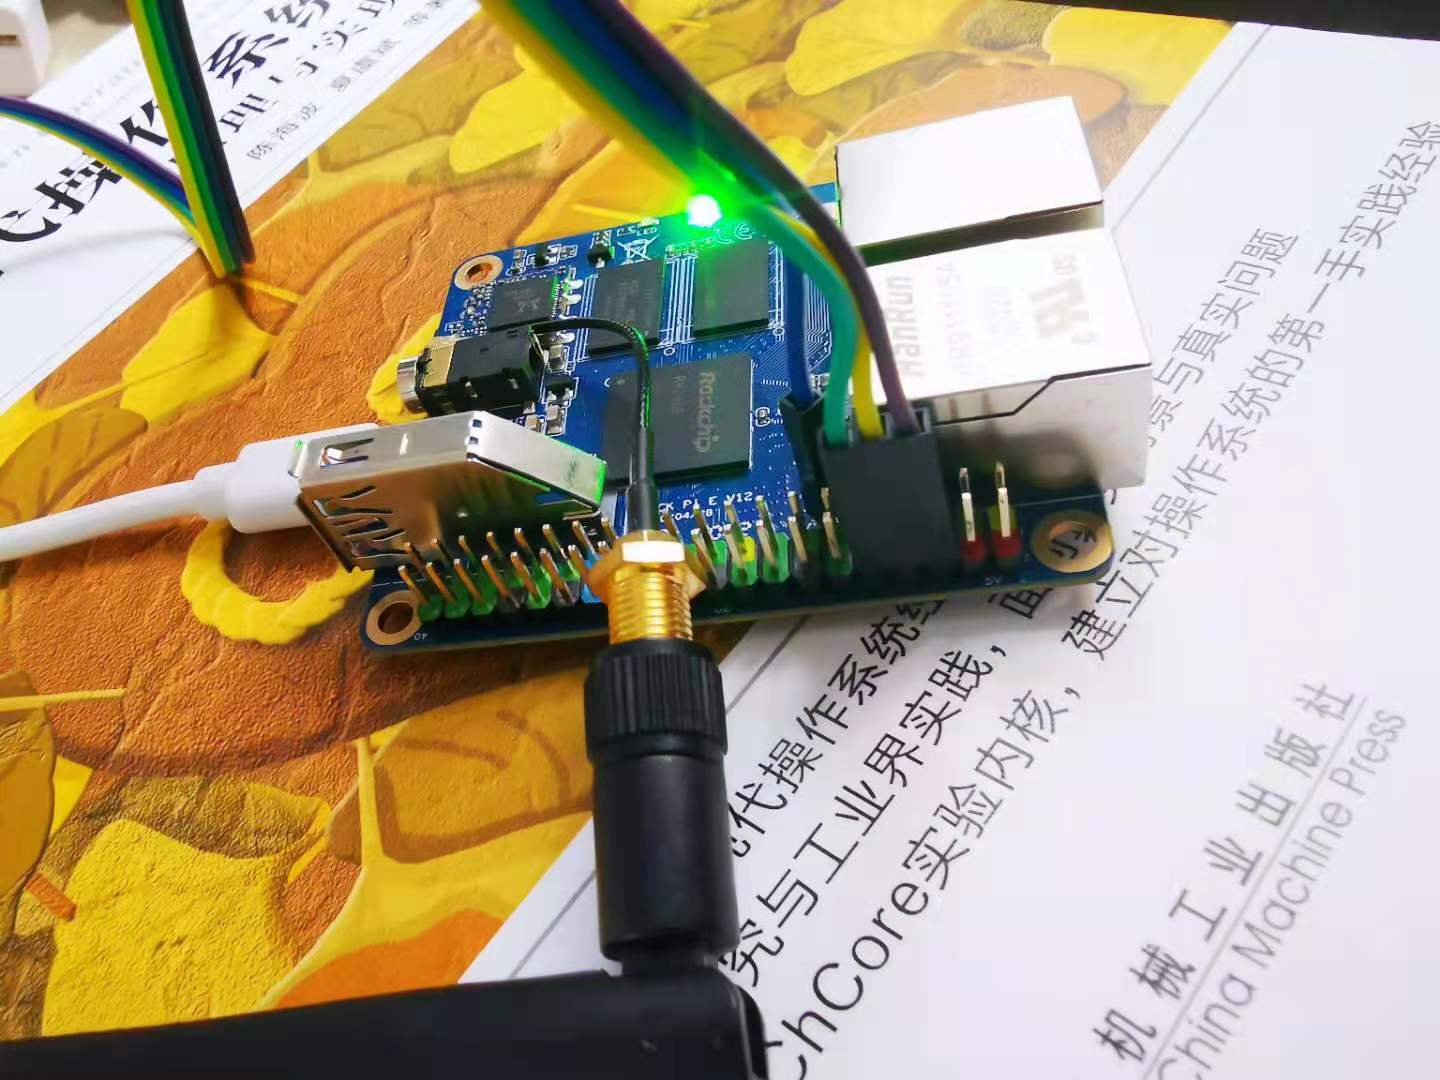
根据Rockpi项目官网烧录Debian镜像并且进行必要的基本配置之后,要使用串口链接板子才能调试。每次使用板子都要接串口线比较麻烦,我们可以配置板子启动后自动连接指定wifi从而使用ssh登录进行开发。不过某些场景下只有使用串口才能会获取完整打印(比如模块加载,内核崩溃),这里还是保留串口连接的方法:
| ROCK Pi E | <—> | USB to TTL cable |
|---|---|---|
| RX(pin 10) | <—> | Grey wire |
| TX(pin 8) | <—> | Purple wire |
| GND(pin 6) | <—> | Black wire |
信号的稳定起见这里也连接了地线,如下图:
 我这里使用的充电宝供电,接串口线GND供电可能存在漏电流PD协议无法识别,所以要先上电再连接串口线。先在设备管理器中确认串口号,可能需要安装USB转TTL驱动,我使用putty提供的命令行工具plink.exe的连接串口:
plink.exe -serial com5 -sercfg 1500000,8,1,n,N
系统启动后首先要做的是连接WIFI,Debian镜像自带了nmcli用于管理网络连接,在Stackoverflow可以找到使用nmcli连接隐藏WIFI的方法:
# 首先检查设备状态
nmcli device
# WIFI重新扫描
nmcli device wifi rescan
# 列出找到的热点
nmcli device wifi list

# 添加WIFI连接配置(详细的配置方法,可添加隐藏WIFI)
nmcli con add type wifi con-name <connect name> ifname wlan0 ssid <ssid>
# 这里WIFI使用的WPA个人级加密
nmcli con modify <connect name> wifi-sec.key-mgmt wpa-psk
# 设置对应的密码
nmcli con modify <connect name> wifi-sec.psk <password>
# 尝试连接配置
nmcli con up <connect name>

# 不保存配置直接连接
nmcli device wifi connect <AP name> password <password>
确认网络可以ping通,然后你可能需要添加debain包管理器对arm32位硬件浮点的支持:dpkg --add-architecture armhf,因为部分deb安装文件没有提供arm64版本。再更改为就近人少的apt源,这里我使用华南农业大学的apt源。
root@rockpie:/tmp# cat /etc/apt/sources.list
deb https://mirrors.scau.edu.cn/debian stable main contrib non-free
# deb-src https://mirrors.scau.edu.cn/debian stable main contrib non-free

deb https://mirrors.scau.edu.cn/debian stable-updates main contrib non-free
# deb-src https://mirrors.scau.edu.cn/debian stable-updates main contrib non-free

# deb https://mirrors.scau.edu.cn/debian stable-proposed-updates main contrib non-free
# deb-src https://mirrors.scau.edu.cn/debian stable-proposed-updates main contrib non-free

# 可选的unstable仓库
#deb https://mirrors.scau.edu.cn/debian unstable main contrib non-free
使用sudo apt update更新本地db,这里有报错未识别的gpg key。
root@rockpie:/tmp# apt update
Get:1 http://apt.radxa.com/buster-stable buster InRelease [2360 B]
Get:2 https://mirrors.scau.edu.cn/debian unstable InRelease [157 kB]
Hit:3 https://mirrors.scau.edu.cn/debian stable InRelease
Get:4 https://mirrors.scau.edu.cn/debian stable-updates InRelease [51.9 kB]
Err:1 http://apt.radxa.com/buster-stable buster InRelease
  The following signatures couldn't be verified because the public key is not available: NO_PUBKEY B99C4BEFEC47E96E
...
Reading package lists... Done
W: GPG error: http://apt.radxa.com/buster-stable buster InRelease: The following signatures couldn't be verified because the public key is not available: NO_PUBKEY B99C4BEFEC47E96E
E: The repository 'http://apt.radxa.com/buster-stable buster InRelease' is not signed.
N: Updating from such a repository can't be done securely, and is therefore disabled by default.
N: See apt-secure(8) manpage for repository creation and user configuration details.
root@rockpie:/tmp# apt search rust-fd-find
Sorting... Done
Full Text Search... Done
根据Radax Apt Intro下载对应的公钥然后通过apt-key添加:
wget -O - apt.radxa.com/stretch/public.key | sudo apt-key add -
更新为快速的APT源之后这里您可能需要补充一些工具,例如less,vim等。同时Debian的.bashrc非常简单,需要自行完善一下,例如export PAGER=less把默认pager从more改为less。
配置的过程中发现有一个调试打印没有关掉,干扰输入,暂且先把内核打印等级降低:
echo 3 > /proc/sys/kernel/printk
RockPiE的Debian镜像没有提供源代码,但是可以通过修改/boot/uEnv.txt配置bootcmd,更改对应的verbosity即可
rock@rockpie:~$ cat /boot/uEnv.txt
verbosity=3
fdtfile=rockchip/rk3328-rock-pi-e.dtb
console=ttyS2,1500000n8
overlays=rk3328-uart2
rootuuid=a24441c8-7610-4a9e-9635-8c0def89c171
initrdsize=0xb4f2ae
kernelversion=4.4.194-12-rockchip-g615ae7431150
initrdimg=initrd.img-4.4.194-12-rockchip-g615ae7431150
kernelimg=vmlinuz-4.4.194-12-rockchip-g615ae7431150
最后进入正题配置开机连接WIFI并设置静态IP,这里依靠netplan工具
apt-get install netplan.io
在/etc/netplan/下一个配置文件:
root@rockpie:~# cat /etc/netplan/02-wireless.yaml
network:
  version: 2
  renderer: networkd
  wificon:
    wlan0:
      dhcp4: no
      dhcp6: no
      addresses: [192.168.0.220/24]
      gateway4: 192.168.0.1
      nameservers:
        addresses: [192.168.0.1, 8.8.8.8]
      access-points:
        "rockpi-2.4g":
          password: "rockpistar"
这里替换为自己WIFI的AP名字和密码,注意检查IP地址的有效性,然后应用配置:
netplan apply
可以看到WIFI已经重新连接并且设置为192.168.0.220的固定IP:
rock@rockpie:~$ ip addr show dev wlan0
4: wlan0: <BROADCAST,MULTICAST,UP,LOWER_UP> mtu 1500 qdisc mq state UP group default qlen 1000
    link/ether 7c:a7:b0:0f:95:16 brd ff:ff:ff:ff:ff:ff
    inet 192.168.0.220/24 brd 192.168.0.255 scope global wlan0
       valid_lft forever preferred_lft forever
    inet 192.168.0.103/24 brd 192.168.0.255 scope global secondary noprefixroute wlan0
       valid_lft forever preferred_lft forever
    inet6 fe80::2c6:3762:671a:525c/64 scope link
       valid_lft forever preferred_lft forever
查看netplan的systemd启动项是否也已生效
rock@rockpie:~$ systemctl status *netplan*
鈼 netplan-wpa-wlan0.service - WPA supplicant for netplan wlan0
     Loaded: loaded (/run/systemd/system/netplan-wpa-wlan0.service; enabled-runtime; vendor preset: enabled)
     Active: active (running) since Fri 2021-06-04 04:02:00 UTC; 26min ago
   Main PID: 452 (wpa_supplicant)
      Tasks: 1 (limit: 1094)
     Memory: 4.0M
     CGroup: /system.slice/netplan-wpa-wlan0.service
             鈹斺攢452 /sbin/wpa_supplicant -c /run/netplan/wpa-wlan0.conf -iwlan0

Warning: some journal files were not opened due to insufficient permissions.
OK,然后重启检测下应该此时就能够在系统启动时自动连接WIFI了,就不再需要串口线的连接了